
Follow these steps to assemble your Miracord 40 (MRC401), adjust the tonearm, and play your first record. For the factory-installed Audio-Technica AT95E cartridge, set the tracking force to 2.0 g and hang the anti-skate weight from notch 2, the middle groove.
- Unpack the turntable
- Fit the platter, belt, and dust cover
- Balance the tonearm and set tracking force
- Attach the anti-skate weight
- Connect the turntable
- Play your first record
1. Unpack the turntable
Choose a stable, level surface away from loudspeakers and other sources of vibration. Leave room for the dust cover to open. Remove the accessories first, then lift the turntable by the base with both hands. Keep the packing for transport.
Check for the platter, rubber mat, drive belt, dust cover and hinges, counterweight, smaller hanging anti-skate weight, large-hole record adapter, RCA cable with ground lead, and power adapter. If anything is missing or damaged, contact your dealer before continuing.
Leave the power adapter disconnected through assembly and tonearm setup. Keep the tonearm clipped into its rest and the stylus guard fitted until you reach the balancing step.
2. Fit the platter, belt, and dust cover
- Seat the platter squarely on the centre spindle. Route the belt around the platter’s drive surface and use the platter opening to slip it over the motor pulley. The belt should lie flat without a twist.
- Turn the platter slowly by hand to check that the belt stays in place. Lay the rubber mat flat on top, with its centre hole over the spindle.
- Fit the hinges into their matching fittings and seat the dust cover evenly. Support the cover as you check that it opens and closes freely.
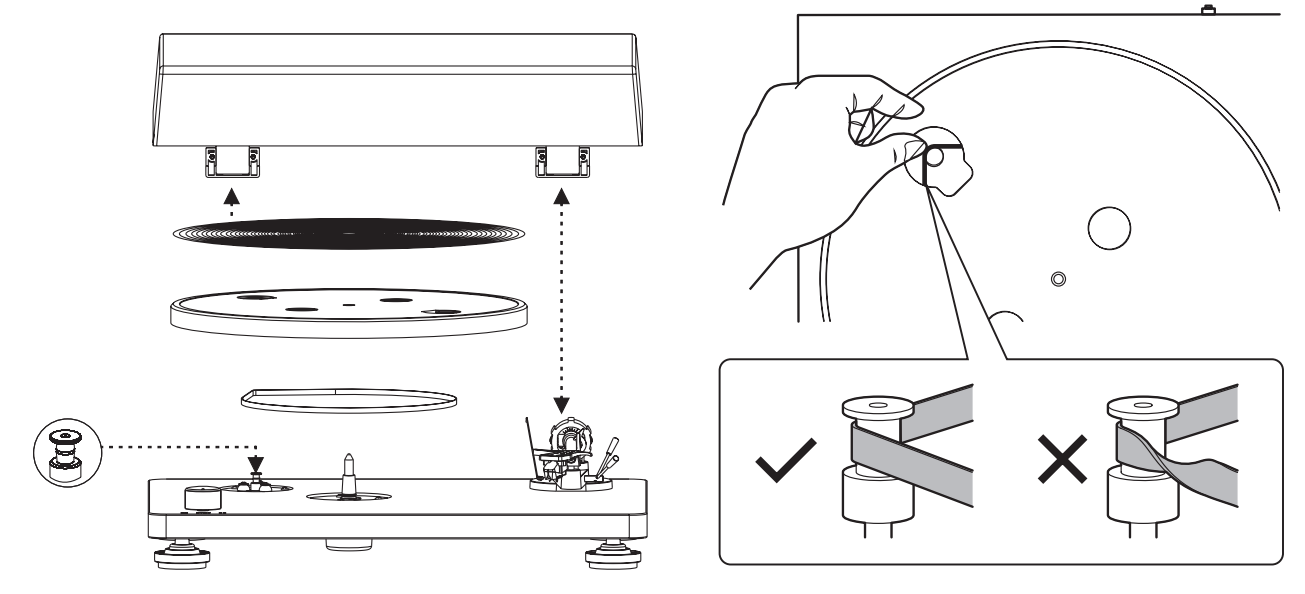 Reach through the platter opening to fit the belt over the motor pulley.
3. Balance the tonearm and set tracking force
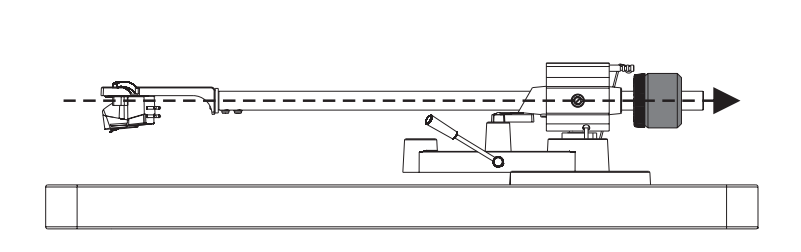
Make the tonearm float level
- Slide the counterweight onto the back of the tonearm with the numbers facing the cartridge. Leave the anti-skate weight off.
- Support the headshell, the part holding the cartridge. Carefully remove the stylus guard, release the arm clip, and move the arm clear of its rest. Lower the cue lever fully while supporting the headshell. Keep the stylus clear of the platter and base.
- Turn the counterweight body a little at a time. Briefly release the headshell with a hand just beneath it. When the arm stays level without rising or falling, return it to the rest and secure the clip.
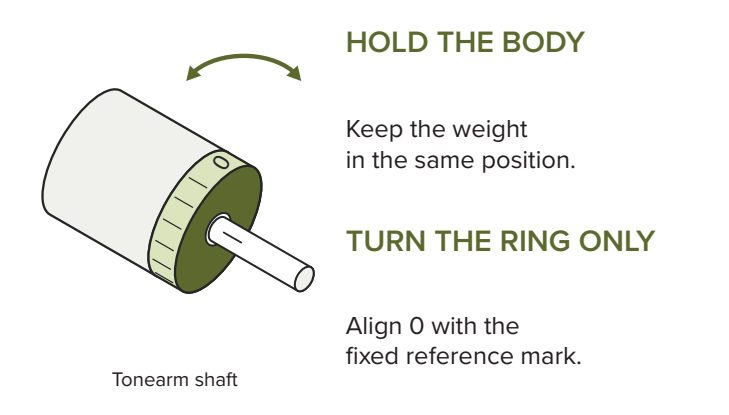
Zero the numbered ring
With the arm clipped in its rest, hold the counterweight body still. Turn only the thin numbered ring until 0 lines up with the fixed reference mark. This calibrates the scale while keeping the weight at the balance point.
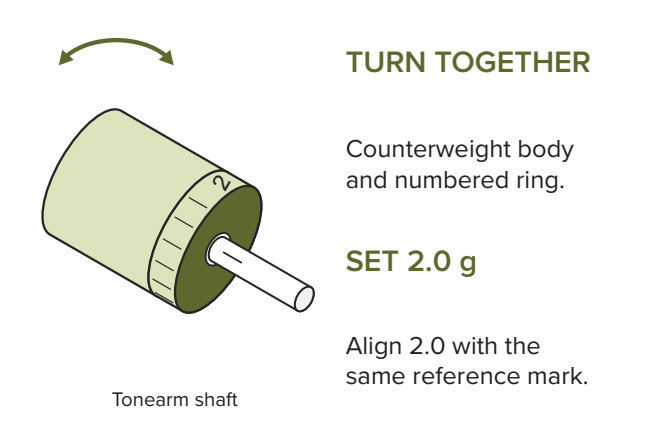
Turn the counterweight to set 2.0 g
With the arm still clipped, grip the counterweight body and turn it so the numbered ring turns with it. Stop when 2.0 lines up with the same mark. If the ring slips, rebalance the arm and zero it again. You can verify the result with a stylus-force gauge.
4. Attach the anti-skate weight
For the supplied AT95E at 2.0 g, slip the thread loop into notch 2, the middle groove. Guide the thread over the wire support. The weight should hang freely, clear of the turntable base and cables.
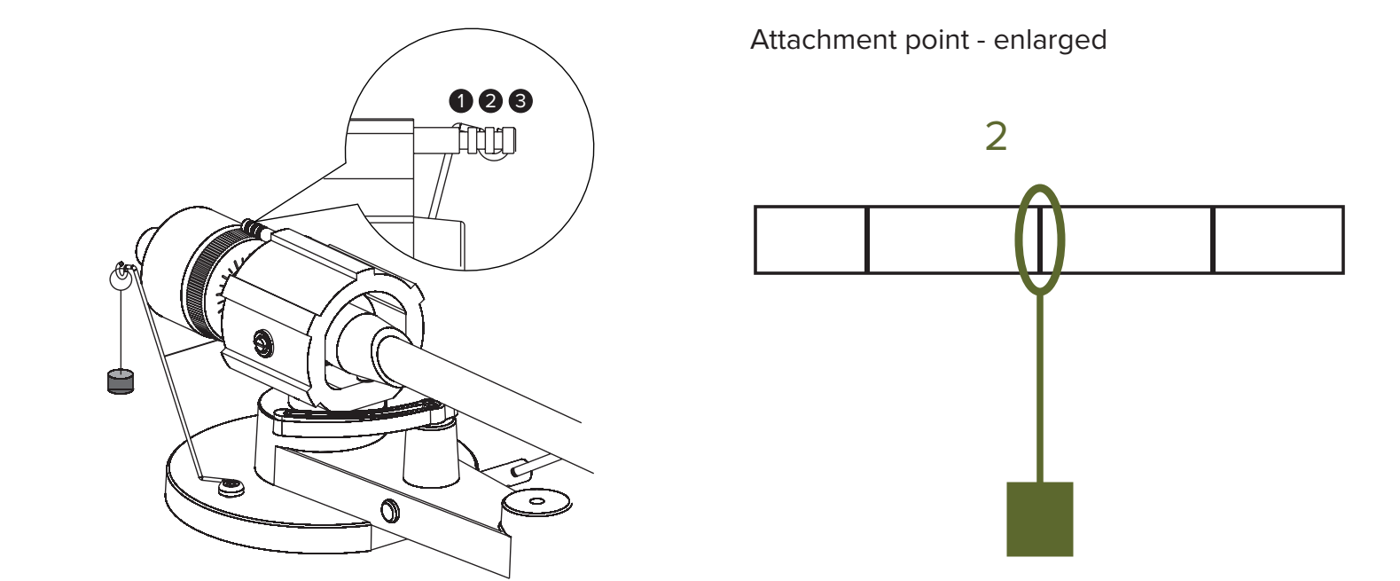
For a different cartridge or stylus, use its recommended tracking force to choose a starting notch.
| Notch | Tracking force |
|---|---|
| 1 | 1.0–1.5 g |
| 2 | 1.5–2.0 g |
| 3 | 2.0–2.5 g |
Where the ranges overlap, start with the lower notch. Use notch 1 at 1.5 g and notch 2 at 2.0 g. If you hear repeatable distortion mainly in the right channel, try the next notch while keeping the tracking force unchanged.
5. Connect the turntable
Turn down the volume and switch off connected equipment before changing cables or the PHONO EQ setting. Connect the RCA plugs red to R and white to L.
- LINE or AUX input: Set PHONO EQ to ON to use the built-in preamp. This works with a line input on an amplifier, receiver, or powered speakers. The built-in preamp normally works without a separate ground lead. If your amplifier or receiver has a GND terminal, connect the ground lead to it.
- MM PHONO input or external MM phono preamp: Set PHONO EQ to THRU. If the receiving phono stage has a GND terminal, connect the ground lead to it. Connect an external phono preamp’s output to LINE or AUX.
Never connect the ground lead to a wall outlet. Connect the supplied power adapter to DC IN, then to a suitable wall outlet. Set the separate rear power switch to ON.
See the rear panel and troubleshoot hum, quiet audio, or no sound.
6. Play your first record
- Put a clean record on the mat. Use the large-hole adapter only if the record needs it. Select 33 for 33⅓ rpm or 45 for 45 rpm, as marked on the record.
- Keep the volume low. Raise the cue lever, release the arm clip, and use the finger lift to guide the stylus above the lead-in groove. Lower the cue lever gently. Raise the volume after playback begins.
- At the end of the side, lift the arm with the cue lever and guide it back to the rest. Lower the arm, secure the clip, and set the speed selector to 0. Wait for the platter to stop before handling the record. When you finish listening, set the rear switch to STANDBY.
More help
For a platter that won’t turn, check the adapter, rear power switch, and speed selector. If the platter still won’t turn, disconnect power and check the belt routing. For skipping, check the surface is level, clean the record and stylus, and recheck tracking force and anti-skate.